

How Do You Change Out A Back Seal On A Motor
 The last two blog posts were an effort to attempt something new; lighter topics in the style of "fluffier" blogs or "news" feeds. I see from the blog visitor statistics that our audience prefers something more substantial, something useful – not fun facts and glory pools.
Cheers! We now return to the topics that most involvement y'all – technical topics with some meat on information technology! Nosotros'll starting time off with a problem that well-nigh every pool owner can relate to – a leaking mechanical shaft seal, how to identify it, and how to repair it, too. Simply giving the people what they want.
WHAT IS A Pool PUMP SHAFT SEAL?
Shaft Seals prevent water from leaking forth the motor shaft, simply backside where it connects to the impeller. The motor shaft goes through the seal plate, or the subclass that connects to the pump. The design of a shaft seal allows the shaft to spin without any direct contact (which would immediately cause a seal failure with the shaft rotating at 3250 RPM).
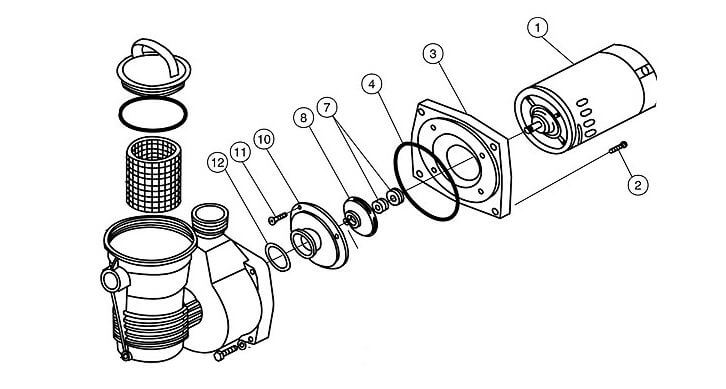
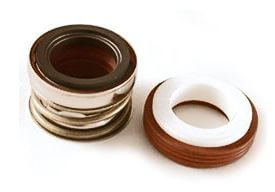
Shaft seals (#7) are composed of two halves, a round ceramic ring encased in rubber (what I call the 'Donut'), and the other one-half with the spring, or the 'Spring Half'. The donut usually sits in the seal plate (#iii), and the bound one-half slips over the impeller (#8). As the impeller is tightened downwards, the spring half mates perfectly with the donut one-half, sealing up the shaft from water leakage, without really touching the shaft.
WHY DO POOL PUMP SHAFT SEALS Neglect?
Shaft seals are constantly immersed in water, and although they are constructed of loftier grade stainless steel and chemic resistant rubber, chemical degradation can take a toll. Over time, near constant depression pH or loftier chlorine will break downwards seal materials, and crusade a shaft seal to leak. Ozone tin can besides damage shaft seals, but not when installed properly. A saltwater puddle may cause a shaft seal to fail. For these cases, we have Ozone/Table salt shaft seals, made with premium rubbers and steel.
Another cause of seal failure is running the pump dry , or nearly dry. With very little water running through the pump, the water inside gets very hot which can melt and warp some shaft seals. This usually happens from a loss of pump prime from low h2o level, stuck skimmer weirs or a large air leak in front of the pump.
A third cause of shaft seal failure is caused from a water hammer effect. This tin can happen if you start upwardly the pump in leap without taking the return plugs out of the wall, or from closing a return side valve suddenly while the pump is running, or turning the multiport to aftermath without turning the pump off first. This is known as a "seal blow-out", and that's exactly what happens, the seal cracks or becomes dislodged from the seal plate.
HOW Practice I KNOW WHAT SHAFT SEAL TO Utilise?
 Skillful question, shaft seals aren't labeled, and you lot want to have the correct shaft seal in manus before you open the pump. They are somewhat standard; in that location aren't dozens and dozens used on residential pool pumps. The most common shaft seals are #100, #200, #201 and #1000.
You can find the correct shaft seal by visiting the schematic pump parts diagram for your particular pump, or yous could simply use the handy common pool pump seal chart that I created, merely for yous. Click it to view the larger paradigm.
HOW Do I KNOW IF THE SHAFT SEAL HAS FAILED?
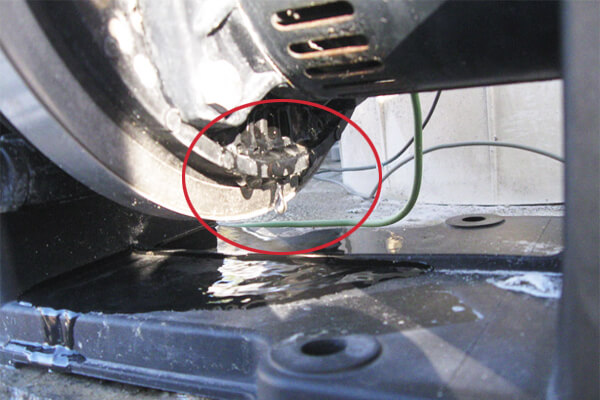
If it's leaking, then it has reached the cease of a hopefully long service life. A leaking shaft seal has a item signature leaking manner all its own, and should non be confused with two other types of pump leaks. H2o effectually the pump could also be leaking from the PVC plumbing plumbing fixtures on acme of the pump, which runs down and drips off of the lesser of the pump, correct below the shaft seal. A loose clamp band or o-ring on the seal plate can too cause a pump to drip on the ground – directly below where the seal would leak.
Don't be fooled past a loose clamp ring or loose PVC plumbing equipment! A shaft seal that has failed will leak h2o between the motor and the seal plate, where the donut half of the seal sits. The h2o runs downwards the back of the seal plate for an inch or 2, before dripping off onto the ground. Pumps with open brackets are like shooting fish in a barrel to see if the seal is leaking and may exist spraying wildly, merely nigh leaking shaft seals are hard to meet, unless you get your head on the ground with a flashlight. Most failed shaft seals volition leak whether the pump is on or off, only volition leak more with the pump running.Click the image to run into ii examples in a (much) larger epitome.
HOW Do I Supercede A Pool PUMP SHAFT SEAL?
First, obtain a new shaft seal. If you can't await to club it online, choice one upwards at a local electric motor shop.
- Shut off the pump at the timer and breaker. Be sure that information technology won't be turned back on during repair.
- Remove the pump clench band or the 4-6 bolts that hold the seal plate / motor to the pump basket.
- Grab the motor (it may be hot) firmly and slide the motor backwards, to pull it from the pump.
- Remove the diffuser or impeller cover, if you have one. Remove the rear motor cover.
- Loosen the capacitor subclass screw at 9 o'clock, to pull the capacitor out of the manner.
- Slip a one/2″ wrench onto the rear of the motor shaft to concur information technology stationary, the shaft is slotted on the stop.
- Slip big pliers or strap wrench over the impeller, to gently unscrew it from the shaft.
- Disconnect the seal plate from the motor, knock out the one-time donut seal half with a screwdriver.
- Remove the erstwhile seal one-half from the back of the impeller.
- Clean up the seal plate, impeller and motor shaft surfaces if they are dirty or rusty.
- Push the new donut half firmly into the seal plate, using the cardboard slice, to go along it clean. (#1000 seals are printing fit into place, using a 1″ PVC coupling and a small hammer. Earlier press fitting information technology, smear a minor amount of Bluish RTV or similar gasket silicone.)
- Push button jump one-half onto impeller; hard plastic end facing the motor, soft rubber stop facing impeller. (Run across seal instruction sheet if unclear – a backwards placed seal volition leak from the get-go!)
- Replace the seal plate onto the pump, and thread the impeller onto the motor shaft.
- Slide the motor back into the pump, existence conscientious that the o-band makes a practiced seal.
- Tighten upwardly the clench bands, or if your pump has bolts, tighten all equally and firmly.
- Make full the pump up with water, open up closed valves and examination out your handiwork!
Wow – xvi steps to supersede a shaft seal! Some of them only take a few seconds though. Replacing a pool pump shaft seal can be completed in thirty minutes, it's not usually complicated.
The hardest part for most people is getting the impeller off – that's steps 5 and half-dozen – you lot have to hold the shaft stationary, so it won't move as you spin off the impeller. Later on that is conquered the next pitfall might be putting the seal in backwards. Accept a good look at how the shaft seal is oriented equally you remove the old donut and bound halves, and refer to the included diagram, when included.

Rob Cox
InTheSwim Weblog Editor

How Do You Change Out A Back Seal On A Motor,
Source: https://blog.intheswim.com/pool-pump-shaft-seal-replacement/
Posted by: georgewrond1958.blogspot.com
0 Response to "How Do You Change Out A Back Seal On A Motor"
Post a Comment